
7 - Hand soldering and assembly rework
7.1 - Basics of hand soldering
Basics of hand soldering
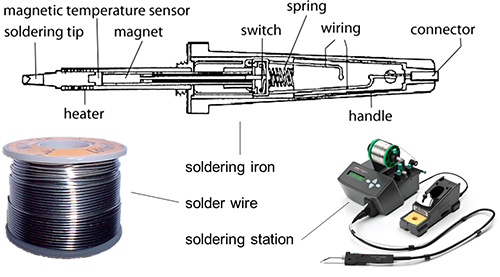
Hand soldering requires two main accessories: a soldering iron and solder. Soldering irons are the heat sources used to melt solder nearby the components. Irons of the 15W to 60W range are good for most electronics/printed circuit board work. Anything higher in wattage and you risk damaging either the component or the board.
Steps of hand soldering
Step 1. Component placement
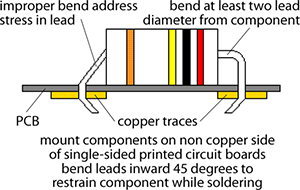
After the component and board have been cleaned, you are ready to place the component on the board. Bend the leads as necessary and insert the component through the proper holes on the board. To hold the part in place while you are soldering, you may want to bend the leads on the bottom of the board at a 45 degree angle. Once you are sure that the component is properly placed, you can more on to the next step. Extend leads from component so that they are stress relieved. Bends should be at least two lead diameters from the component. Minimum inside radius of the bend should be equal to a lead diameter. Part identification should be visible with the part in place.
After the component and board have been cleaned, you are ready to place the component on the board. Bend the leads as necessary and insert the component through the proper holes on the board. To hold the part in place while you are soldering, you may want to bend the leads on the bottom of the board at a 45 degree angle. Once you are sure that the component is properly placed, you can more on to the next step. Extend leads from component so that they are stress relieved. Bends should be at least two lead diameters from the component. Minimum inside radius of the bend should be equal to a lead diameter. Part identification should be visible with the part in place.
Step 2. Preparing the soldering iron tip before soldering
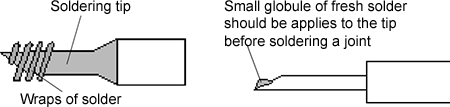
The solder tip must be applied to the joint at such an angle that the point of contact can be observed during the soldering process. This is generally at about a 45° angle. The soldering tip must be clean and freshly tinned before soldering. It is extremely important that a new, never been heated tip be tinned immediately upon it reaching the temperature that melts solder. Tinning is accomplished by applying fresh solder and flux to the tip and allowing all soldering surfaces to become coated with solder.
The solder tip must be applied to the joint at such an angle that the point of contact can be observed during the soldering process. This is generally at about a 45° angle. The soldering tip must be clean and freshly tinned before soldering. It is extremely important that a new, never been heated tip be tinned immediately upon it reaching the temperature that melts solder. Tinning is accomplished by applying fresh solder and flux to the tip and allowing all soldering surfaces to become coated with solder.
- Wrap the tip with solder wire while iron is cold
- Heat iron till solder melts
- Wait to wetting all the tip soldering surfaces
- Wipe excess solder from tip
Step 3. Apply heat
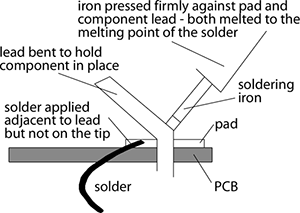
The soldering iron tip should be applied firmly to the metal part having the greatest mass while also touching the part to be soldered to it. Apply heat until both the parts to be joined are sufficiently hot to melt the solder. Quickly apply solder adjacent to the tip, but not on the tip. The solder should flow quickly around the components. Withdraw the tip as soon as the joint is complete to avoid overheating the molten solder. The soldering process should be completed within 2 seconds. If it takes up to 5 seconds then the tip is too small, the iron too small, or the technique incorrect. The soldering tip should be at a temperature of about 343 °C. The surface temperature of both metals being soldered must be above the solder melting point to expedite efficient wetting. Solder should not be permitted to flow onto a surface cooler than the solder temperature; this will cause "cold" joints. Properly applied solder will melt and flow smoothly around the surfaces being soldered producing a smooth, shiny surface feathering out to a smooth thin edge. A rounded, lumpy, dull, irregular, or granular appearance indicates improper solder application.
The soldering iron tip should be applied firmly to the metal part having the greatest mass while also touching the part to be soldered to it. Apply heat until both the parts to be joined are sufficiently hot to melt the solder. Quickly apply solder adjacent to the tip, but not on the tip. The solder should flow quickly around the components. Withdraw the tip as soon as the joint is complete to avoid overheating the molten solder. The soldering process should be completed within 2 seconds. If it takes up to 5 seconds then the tip is too small, the iron too small, or the technique incorrect. The soldering tip should be at a temperature of about 343 °C. The surface temperature of both metals being soldered must be above the solder melting point to expedite efficient wetting. Solder should not be permitted to flow onto a surface cooler than the solder temperature; this will cause "cold" joints. Properly applied solder will melt and flow smoothly around the surfaces being soldered producing a smooth, shiny surface feathering out to a smooth thin edge. A rounded, lumpy, dull, irregular, or granular appearance indicates improper solder application.
Step 4. Remove heat
Once the surface of the pad is completely coated by the solder, you can stop adding solder and remove the soldering iron (in that order). Don't move the joint for a few seconds to allow the solder to cool. If you do move the joint, you will get what's called a "cold joint".
Once the surface of the pad is completely coated by the solder, you can stop adding solder and remove the soldering iron (in that order). Don't move the joint for a few seconds to allow the solder to cool. If you do move the joint, you will get what's called a "cold joint".
Step 5. Finishing the solder joint
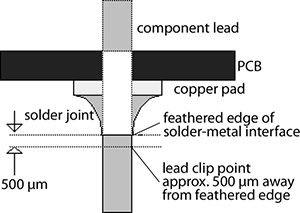
Cut off excess leads. Do not clip into the feathered solder edge. Leave a slight headroom so that the solder is not separated from the lead by the shock forces imparted during cutting.
Cut off excess leads. Do not clip into the feathered solder edge. Leave a slight headroom so that the solder is not separated from the lead by the shock forces imparted during cutting.
| Previous | Next |