
3 - Solder paste stencil printing
3.2 - Condition of solder pastes, stencil life
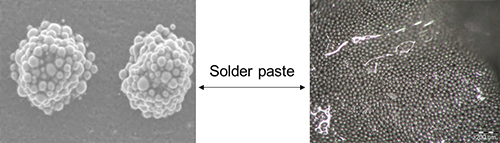
Solder paste composition
Solder paste is a combination of pre-alloyed spherical metal powder and flux medium. Solder paste formulations are designed with specific characteristics of tack time, stencil life, and rheology (flow characteristics). As solder paste ages and is used in production, these characteristics will change. Handling solder paste properly will preserve the original characteristics of the solder paste longer, resulting in less paste waste, better process yield, and lower defect rates.
Condition of solder pastes
Moisture
Moisture is a contaminant, and is perhaps the most detrimental element that solder paste can be exposed to. Moisture can cause and increase powder oxidation, which in turn requires more of the activator to expend itself on cleaning the solder powder and less for cleaning the components and substrate. This may result in poor or non-wetting. Moisture also causes slumping that can lead to bridging, may result in solder balling when the paste is reflowed, can result in flux/solder spatter, and can reduce tack time.
Moisture is a contaminant, and is perhaps the most detrimental element that solder paste can be exposed to. Moisture can cause and increase powder oxidation, which in turn requires more of the activator to expend itself on cleaning the solder powder and less for cleaning the components and substrate. This may result in poor or non-wetting. Moisture also causes slumping that can lead to bridging, may result in solder balling when the paste is reflowed, can result in flux/solder spatter, and can reduce tack time.
Solder paste storage
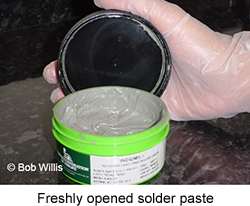
It is critical that solder paste be received in and stored as soon as it arrives to its final destination. Solder paste should not remain on the receiving dock where it could be exposed to excessive heat, humidity, or cold. It is generally recommended to store solder paste in refrigeration at 40 °F/4 °C.
It is critical that solder paste be received in and stored as soon as it arrives to its final destination. Solder paste should not remain on the receiving dock where it could be exposed to excessive heat, humidity, or cold. It is generally recommended to store solder paste in refrigeration at 40 °F/4 °C.
Excessive heat
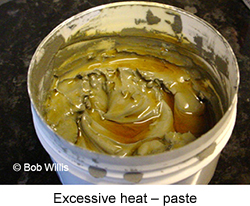
Because solder paste is made of two ingredients with very different densities, it is normal in some formulations for a bit of flux to separate out of the paste and rise to the top of the material. If a solder paste is exposed to excessive heat for a prolonged period of time, however, the separation of the flux medium from the body of the paste may increase dramatically. This is recognizable when opening a jar of solder paste or viewing the contents of a container; although it is natural and acceptable for some flux to appear on the surface of the solder paste, if the paste has become heat damaged a thick deposit of flux will be floating on top of the paste.
Because solder paste is made of two ingredients with very different densities, it is normal in some formulations for a bit of flux to separate out of the paste and rise to the top of the material. If a solder paste is exposed to excessive heat for a prolonged period of time, however, the separation of the flux medium from the body of the paste may increase dramatically. This is recognizable when opening a jar of solder paste or viewing the contents of a container; although it is natural and acceptable for some flux to appear on the surface of the solder paste, if the paste has become heat damaged a thick deposit of flux will be floating on top of the paste.
Printer area conditions
As stated earlier, heat and humidity are damaging to solder paste. Ideally, the printing area should be maintained at 40–50% relative humidity and 72–80 °F (22–26 °C). In addition, no air (cool or warm) should blow directly on the top or bottom of the stencil, as this can cause paste dry-out.
As stated earlier, heat and humidity are damaging to solder paste. Ideally, the printing area should be maintained at 40–50% relative humidity and 72–80 °F (22–26 °C). In addition, no air (cool or warm) should blow directly on the top or bottom of the stencil, as this can cause paste dry-out.
Preparing solder paste: warming
Before solder paste is used, it should be removed from refrigeration and allowed to warm naturally to ambient temperature. Do not remove any seal, open, or attempt to mix solder paste until it has warmed completely to room temperature. The typical warming or stabilization time for solder paste is four to six hours. Do not force warm solder paste, as this may cause flux separation and/or rheological problems.
Before solder paste is used, it should be removed from refrigeration and allowed to warm naturally to ambient temperature. Do not remove any seal, open, or attempt to mix solder paste until it has warmed completely to room temperature. The typical warming or stabilization time for solder paste is four to six hours. Do not force warm solder paste, as this may cause flux separation and/or rheological problems.
Preparing solder paste: stirring
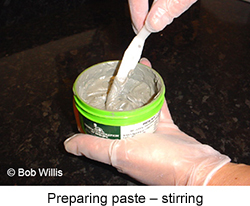
Once it has warmed adequately, mix the solder paste lightly and thoroughly in one direction for one to three minutes by a means of spatula. This will ensure an even distribution of any separated material throughout the paste. However, care should be taken not to over-mix the solder paste by stirring it too vigorously or for too long. This can result in overly shear-thinning the solder paste, which can result in slumping and/or bridging.
Once it has warmed adequately, mix the solder paste lightly and thoroughly in one direction for one to three minutes by a means of spatula. This will ensure an even distribution of any separated material throughout the paste. However, care should be taken not to over-mix the solder paste by stirring it too vigorously or for too long. This can result in overly shear-thinning the solder paste, which can result in slumping and/or bridging.
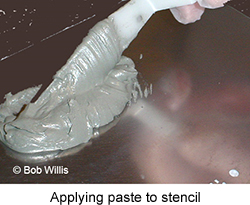
Applying solder paste to the stencil
The initial application of solder paste onto the stencil typically is two to three times greater than applications made during the print cycle. The initial bead of solder paste should be the full length of the printable pattern on the stencil, in a diameter of approximately 1/2 to 5/8 inch. Controlling the level of solder paste on the stencil surface is vital to proper printing. It is better to add a smaller amount of paste more frequently than to add a large amount of paste less often. This method of control will ensure a more frequent turnover of paste, keeping it fresh.
The initial application of solder paste onto the stencil typically is two to three times greater than applications made during the print cycle. The initial bead of solder paste should be the full length of the printable pattern on the stencil, in a diameter of approximately 1/2 to 5/8 inch. Controlling the level of solder paste on the stencil surface is vital to proper printing. It is better to add a smaller amount of paste more frequently than to add a large amount of paste less often. This method of control will ensure a more frequent turnover of paste, keeping it fresh.
Storing opened solder paste containers
Once a jar or cartridge has been opened it should not be re-refrigerated. If solder paste remains in a container that has been opened, simply re-seal the jar or cartridge and leave it out at room temperature until it is ready to be used again. Re-refrigerating the paste can cause any moisture that has been absorbed into the paste to condense, which can then result in the aforementioned moisture-related problems.
Once a jar or cartridge has been opened it should not be re-refrigerated. If solder paste remains in a container that has been opened, simply re-seal the jar or cartridge and leave it out at room temperature until it is ready to be used again. Re-refrigerating the paste can cause any moisture that has been absorbed into the paste to condense, which can then result in the aforementioned moisture-related problems.
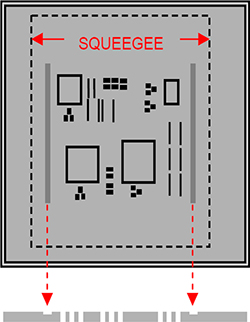
Stencil printer settings
A simplified model (considering Newtonian paste properties) was given by Riemer to describe the pressure value on the stencil during printing:where is the hydraulic pressure, is the apparent viscosity, is the squeegee speed, is the squeegee angle (affected by the printing force), and is the distance from the squeegee tip. This implies that the most important process parameters of the stencil printing are the printing speed and the printing force (squeegee pressure).
The manufacturer of the paste always gives recommendations for the printing speed and squeegee pressure settings. The possible printing speed is determined by the solder pastes thixotropic behaviour. Usually it is in the range from 25 mm/s to 200 mm/s, while pressure is between 20 N and 100 N. The initial settings should be 40 mm/s and 40 N. The speed can be increased until solder paste rolls perfectly on top of the stencil. Medium speed should be set for fine pitch applications such as 50–100 mm/s.
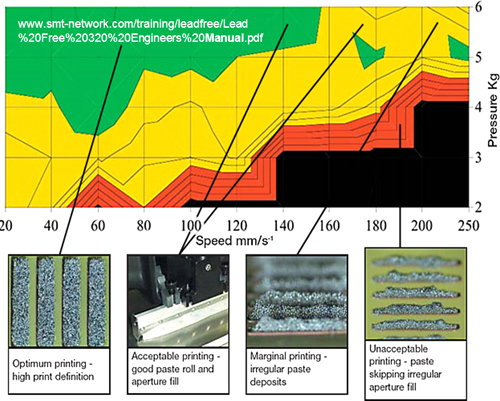
The printing speed can be increased until solder paste rolls perfectly on top of the stencil, if speed is set too high, the solder paste will slide on the stencil, and will not fill the apertures.
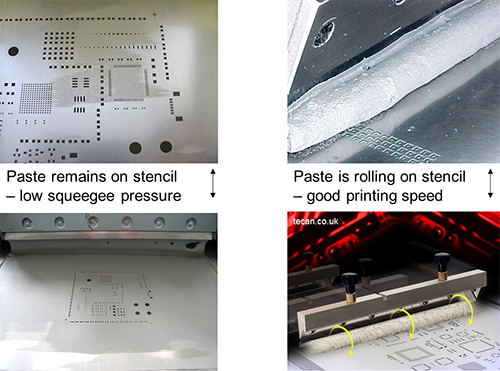
The squeegee pressure should be as low as possible because too much pressure abrades the stencil. Pressure should be increased only when paste remains on stencil after printing, the squeegee does not wipe the stencil thoroughly. If adjusted correctly, a thin layer of flux will remain on top of the stencil and paste is rolling in front of the squeegee. The amount of pressure is determined by printing speed and stencil type.
The squeegee down stop is a mechanical stop that prevents the squeegees to move further down. It must be adjusted only to just touch the stencil surface. However, if the squeegee axis and the stencil are not perfect parallel it can be necessary to over-adjust the down stop to compensate. But, if the down stop is adjusted too far down, both stencils and squeegees will wear out rapidly. Some machines do not have a mechanical down stop but a squeegee origin point. Usually were the squeegee just touches the stencil.
The snap off speed of, which means the speed of separation between stencil and PWB after printing is important. A too rapid separation speed when printing fine pitch will result in clogging of the stencil apertures. A too fast or slow separation will also result in tailing and form high edges around the solder paste deposits. The ideal separation speed depends on the solder paste and the stencil aperture wall smoothness. On the other hand, a slow separation speeds will slows down the printing cycle time.
Stencil life and care
The stencil is the prime element in determining the application of the exact amount of material in the exact location. Therefore it is important that a stencil is considered as a precision engineered tool that is vital to the overall process performance and should be cared for as such. Most stencils will not be used to the end of their stencil life due to:
- Design revision (layout change)
- Process optimization (corrective action)
- Damage (handling)
- Wear (use)
The stencil should be cleaned thoroughly before and after manufacturing as well. The cleaning solvent can be isopropyl alcohol or solvents recommended by the manufacturer of the paste or stencil.
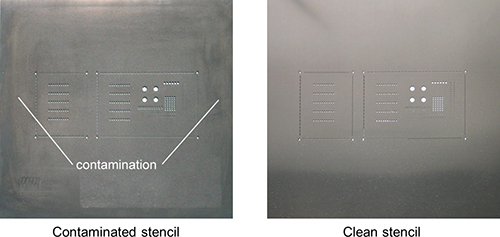
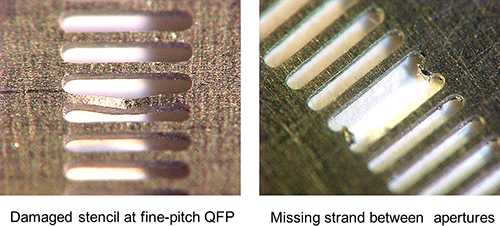
The stencil has to be inspected also before and after manufacturing. Damaged stencils, (for example missing strands between apertures) have to be replaced immediately, since they can cause serious reflow failures.
The tips for maximizing stencil life are the following:
- Proper training & work instructions should be applied
- Good board support should be applied
- Back-etch relief should be applied to compensate surface irregularities
- Proper cleaning and drying after use should be carried out
- Use of stencil wear indicators is suggested, which are usually 25 µm wide recess etched strokes on squeegee side of stencil, outside print area, inside squeegee area.
Stencil life based on its material
| Material | Estimated life span |
|---|---|
| Hard nickel stencil | 100 000 |
| Stainless steel full hardness stencil | 50 000 |
| Standard nickel stencil | 50 000 |
| Copper alloy stencil | 10 000 |
| Soft nickel stencil | 10 000 |
| Emulsion screen | 2 000 |
| Previous | Next |